gastric
Participant
Topics Started: 1
Replies Created: 20
Has Thanked: 0
Been Thanked: 0
Replies created
-
gastric
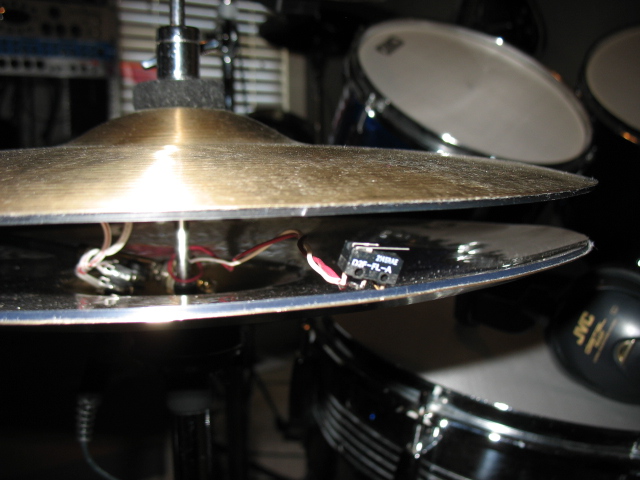
ParticipantI used JMan’s method of clear PVC sheeting adhered with Killer Red tape. It’s an expensive solution, but looks (nearly invisible) and works great. Stuck it to the bottom of all of my cymbals, including right up to the very edge, but not the bells. Bell piezo gets stuck to the bell itself (ideally you’ll want a 27mm piezo purely for size as they fit inside the bell easier than a 40mm) and the bow piezo just gets stuck about 1/2 way between the edge and bell. I currently just have one piezo on the bow installed on the part of the cymbal furthest from the playing area as this seems to eliminate hotspots. I did the same positioning on my ride. My crashes have the piezo in the project box which is right under the playing area. I don’t find hotspoting a concern with crash/splash/china.
Christopher Graham
ParticipantI put sound deadening material on both hat cymbals, but not the bells. Real cymbals are concave and don’t touch except at the very edge so you have no worries about things getting pinched or squished. Normally you install the jack in the bottom bell, or drill a hole to fish the wires. So you’re all set in that regard. I’ve actually squeezed my 25k slider into the inside of the hat as well, plenty of room in there for all sorts of goodies. 😉
Christopher Graham
Replied July 23, 2008 at 15:23 in reply to: Drum shell sizing question for DIY project – Anyone? #1922799ParticipantI think the general concensus is the smaller the mesh head size the better for triggering. Roland heads are most easily available in 12″ sizes, though you can find 14″ if you look hard. Hart mesh heads are less expensive and are available in just about whatever size you want, including for your 22″ bass. Of course you can make your own mesh heads cheaply using a couple layers of Lowe’s solar screen material bonded onto an old acoustic head hoop. Certainly a ton of options. Which makes it confusing. 🙂
I personally took a cheap-O Groove Percussions 5 piece kit and converted it to electronic using cheap 40mm eBay piezos, the Beatnik crossbar method, DIY cones, and Hart heads, and currently an Alesis Trigger IO, and did a set of brass cymbals using the same 40mm piezos and a PVC sheet underneath for sound dampening.
I’ve had good success with the following exceptions:
* 16″ floor tom still provides poor response and mis-triggers. I haven’t cracked the case on it yet. But it’s frustrating. I can tune it out with module settings but then loose playability for rolls and dymanics.
* I have the same issue on my 22″ bass but it’s not an issue to tune it out via module settings since I have a single pedal and the bass doesn’t require as many dymanics and speed overall.
* 14″ snare requires a boost in gain to get subtle nuanced hits which limits overall range, but it’s still very playable
* 16″ ride rings a bit hard on the bow sounds. I haven’t determined if this is my cheap cymbal, piezo location, or an Addictive Drum issue. I’ve always had issues getting a loud, clear “ping” on the bow sound via Addictive and it tends to move quickly towards a harder crashy sounding hit too easily. Particularly after striking the bell. So it’s probably a cymbal or piezo issue more than anything.
* Overall I get some extremely low-velocity mis-triggers that accompany my actual hits across the board. However, they’re not audible and are only visible when reviewing a MIDI piano roll. Most eDrummers aren’t recording MIDI and I suspect many have similar issues they simply aren’t aware of. But if you can’t really hear it I guess it’s not really an issue.My general conclusion is:
* DIY is easy and doesn’t have to be hard or expensive.
* Turning out a totally playable/usable product is pretty easy.
* Getting it to work absolutely perfect is difficult.The V-Drums forum is your best source for DIY stuff. Though not a concise collection that’s the most robust and active source of info available.
Christopher Graham
ParticipantNo, the D4 is mono only. So you would normally only use mono jacks and mono cables, thus only tip and sleeve for the D4. However, you could easily have a stereo output from your trigger (head and rim, or bow and bell) then split the stereo cable to two monos before inputting to the D4. Less cabling on the trigger end.
The Trigger IO has stereo TRS inputs thus you can use a stereo cable and output from your triggers if you’re so inclined. The opposite of my splitter note above, I actually have a couple of choke switches wired in mono and run to a stereo-to-dual-mono splitter on my Trigger IO to not waste a bunch of stereo inputs on mono triggers.
Christopher Graham
ParticipantNote the graphics are specific for Roland wiring requirements to accomodate Roland modules.
For the Alesis D4 and Trigger IO I always wired ceramics to the TIP or RING and brass always to the SLEEVE. I cannot say for the Alesis D5 as I never owned one.
Christopher Graham
ParticipantBTW here’s the Beatnik mirror that is really the basis for the vast majority of the DIY edrum stuff. Tons of excellent, detailed, information full of part #’s, step-by-step instructions, and great photos.
http://www.derksens.com/Beatnik_mirror.htm
Christopher Graham
ParticipantI’m not an electronics guy so I can only tell you what other people have listed for their projects. Here’s two different parts for you to review. I’d think the 25k would be fine for MegaDrum. 30mm of travel is the total switch travel, so you’d have 30mm or less of total hihat/pedal travel from fully open to fully closed. Sounds like a lot but it’s not. I’m in the final construction phase of my own, just short a return spring to pull the slider back to fully opened. There’s not a whole lot of room in my project box so I need a very small spring with a lot of coils in order for it to work properly.
I actually thought the most ideal installation would be in between the two HH cymbals, then you’d never see it, and wouldn’t need a project box at all. Somehow mount the slider body in there to the bottom HH cymbal so it’s stationary, then attach/link the slider arm to the top HH cymbal or the plunger pole the top HH is attached to to provide the movement. No wires, springs, etc. necessary as the actual HH movement would totally actuate the slider. My problem was brainstorming a method of installation that wasn’t totally permenant, allowed the HH to be removed from the stand easily, and yet was strong enough to withstand long term use without coming apart. You could probably just epoxy the slider body to the bottom HH cymbal and construct some easily-removable linkange to the plunger pole that way it’s not physically connected to the top HH cymbal which is where you’d get into problems with the easy-to-remove part.
MOUSER.COM 312-9100-25K called Taiwan Alpha Slide P30mm TRVL Linear 25K
MOUSER.COM 312-9100-10K called Taiwan Alpha Slide P30mm TRVL Linear 10KChristopher Graham
ParticipantI see you’ve been getting some help on the MegaDrum forum. That’s good. Note that the MegaDrum can theoretically support whatever features you want. Piezos, switches for chokes or triggers, combination thereof. With up to 32 TRS inputs per MegaDrum the skies the limit.
As far as cymbals. You should have no problem sticking 2 piezos on each cymbal (one on the bell, another 1/2 way between edge and bell for the bow sound) and some sort of a choke if desired. I’m not exactly sure what choking capabilities the MegaDrum has. But a simple Hellfire-style choke like I’ve implemented would definintely be cheap ($16US or less to put a choke on ALL of your cymbals) and no problem for the MegaDrum. The Roland modules can take it a step further and compute that a quick switch signal is an edge crash and a long switch signal is a choke. Unsure if MegaDrum can do that, but if so that’d be fantastic and another arrow in it’s quiver over the Alesis Trigger IO. That might fall into the “3-way-ride” category that is currenlty unconfirmed as working properly for MegaDrum.
For the hihat you can simply stick one piezo on the cymbal, wire that to an input on the MegaDrum. Just like any other trigger. Separately for the hihat you need some sort of pedal. It can be a simple on/off switch of which you can make basically anything you want. Switch on the pedal. Switch on the cymbal. Switch on the hihat stand. Switch in your shoe. It doesn’t matter in that case as it’s a simple on/off switch. You just need to provide some method for the positive and negative of making a contact to complete the circuit. And in fact can literally use two wires, glue them to the stand/pedal somehow, and just construct it in such a fashion that they touch when the pedal is all the way down to trigger the closed. Postive on the bottom edge of the top hihat cymbal, negaive on the top edge of the bottom. Cymbals close, complete circuit, viola! Or for that matter use the entire cymbal as part of the circuit, assuming you didn’t dampen them on the inside. Connect wire to top cymbal, another to bottom, when they touch it completes the circuit. Might not be as successful using the actual cymbals as if you’re hitting them while closed they could bounce around and break the connection causing choppy closed sounds. But it was a thought. 🙂 Get your gears working on a possible solution.
However, the most ideal method is to rig a 25k potentiometer (check the MegaDrum forum for the most appropriate pot to use, but 25k seems fairly universal to most modules) to the hihat stand. You can find the Beatnik method of sticking a slider in a project box, then connecting the slider to the hihat chain on the low end and a spring/rubber band on the hi end to provide automatic return. Wire that to a mono jack, connect that to the pedal input on the MegaDrum (or any brain/controller) and bam! A variable hihat pedal to provide your opens, closes, and everything in between. Shouldn’t cost much more than constructing a simple on/off. Certainly well under $10US total for a totally variable hihat pedal and probably a worthwhile expenditure as on/off hihats are fairly annoying.
Christopher Graham
ParticipantI still don’t have the slider pots for constructing my variable HH pedal controller yet. So I used a microswitch I had laying around from a paintball marker project a few years ago and wired it to a mono jack with stiff wire, then laid it inside the hihat. It gets smashed when I close the hats, trips the microswitch, and gives me a horribly annoying 2-way open/close to hold me over. Just like the S&S kit 2-way footswitch I’ve hated since day 1.

I wouldn’t suggest this as a permenant option as I can’t imagine the microswitch connectors can take the direct compression for long. But it works, and the use of stiff wires (which I wrapped around the hihat plunger pole to keep it from moving much) keeps the switch placed well.
Does make me thing about how to put the slider pot INSIDE the hats somehow. Though it sounds like it’d be tricky for how to connect the slider to the top hat or plunger pole successfully to actuate the slider. But I’m sure someone’s done it before. Just might look nicer than a box U-bolted to the bottom of the stand and tied to your foot pedal chain. All nice and tidy and invisible inside the hats.
Thought I’d share anyway.

Christopher Graham
Replied June 30, 2008 at 21:29 in reply to: [DESIGN] More Involved Internal Trigger (by Michael Beatnik) #1921977ParticipantNot to detract from the topic at hand but you can follow up on my conversion here: http://www.vdrums.com/forum/showthread.php?t=41153
Christopher Graham
Replied June 30, 2008 at 18:04 in reply to: [DESIGN] More Involved Internal Trigger (by Michael Beatnik) #1921970ParticipantIt’s actually called a C-channel. They sell them in the same area they sell metal bars and rods which is usually at the end of the aisle where the screws/nuts are. They don’t stock much of it at my local one so they’re always out.
Christopher Graham
ParticipantHellfire posted some printable PDF easy cut-out templates for the
switch. If using an acoustic brass/metal cymbal I’d just do one metal
strip of flashing and use some “thick” tape like Sarge did. I’d think
that 1/16th thick would even be too thick. But see-thru Scotch tape
thickness probably too thin.Regardless, all the brain work has been done. You just need to do the
cutting and installing now. 🙂http://www.vdrums.com/forum/showthread.php?t=41424
Christopher Graham
ParticipantDepending on the price of rims and lugs it’d possibly just be cheaper to buy 10″ and 12″ toms and cut them in half to double the yield. Most come with lugs and hoops on both sides so one tom could yield 2 drums. I’d be curious to know the total cost of buying PVC, hoops, and lugs to create 6 full drums which is how many you’d need for a 5 piece kit. Then note you’d still have to buy/build a rack, mounting hardware, cymbals, stands, yadda yadda.
Not knocking the PVC drums. Just asking for some total cost estimates for comparison to buying a used kit or toms and cutting them.
Christopher Graham
Replied June 28, 2008 at 21:24 in reply to: Any way to build a drum without a drum sound module? #1921937ParticipantYou’re totally on your own for MegaDrum. 🙂 I just know about the project and the features provided. But haven’t researched what to build. I’d personally be building the 32 input one in a rack enclosure. Sounds like you need something more simple.
Christopher Graham
Participant2 zone snare with Trigger IO is simple, as is 2 zone toms. Configure one piezo with a foam cone touching the head for ZONE 1, stick the other piezo on the shell near the part of the rim closest to where you’re likely to hit it for ZONE 2, wire it all to a TRS jack, and plug the TRS cable into the Trigger IO. Set the IO to PP type input and have fun configuring the two separate zones for proper triggering and crosstalk. Generally speaking I set the rim zone with a higher trigger threshold and the head zone will need the crosstalk as it’s more like to accidentally trigger when you hit the rim. The rim won’t accidentally trigger at all and will only trigger when you hit the rim.
I have a snare with 4 piezos along the rim which makes more of the rim consistently effective. The toms which have 1 piezo near the bottom most rim (closest part of the rim towards me) don’t trigger with as much gain when hitting the top (furthest) part of the rim. So you can wire more than 1 piezo in parallel if you really need the entire rim to be equally sensitive.
This is based entirely on my personal experience with my DIY acoustic-to-electronic conversion. So take that, as well as the fact I’m a complete novice at all of this, into consideration when reading my comments. 🙂
Christopher Graham
-
AuthorReplies
