- Forums
- Community
- E-drum Workshop
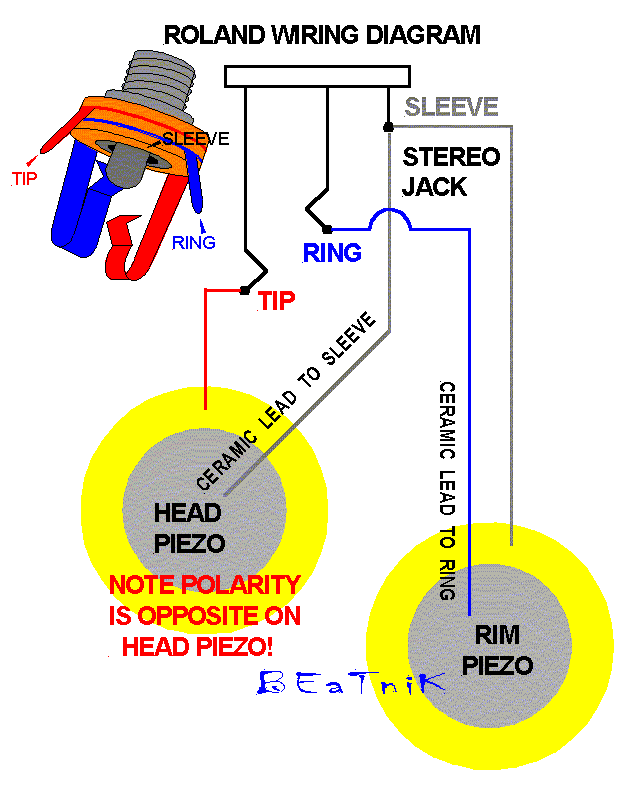
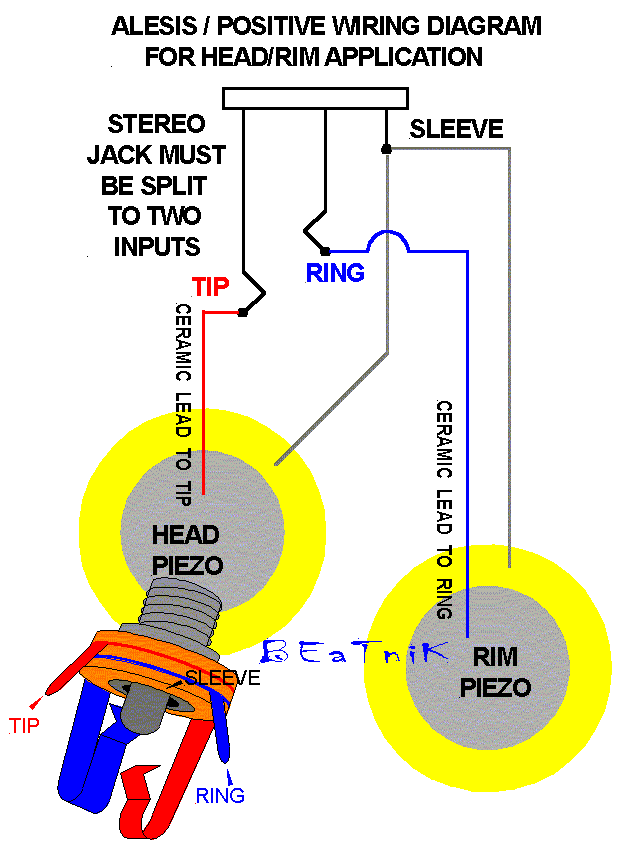
- [INFO] Wiring diagrams (by Michael Beatnik)
[INFO] Wiring diagrams (by Michael Beatnik)
E-drum Workshop
-
Posted May 14, 2007 at 10:05 #1890308
-
CreatorTopic
Viewing 15 replies - 1 through 15 (of 26 total)
-
Replied June 1, 2007 at 00:49 #1916759
tazinnuedo
Participantwhy reverse tip and sleeve wires for the head piezo on roland’s modules… what are the consequences???? (i have not reversed the wires on the head piezos… with a td10 expanded module and it works… so how reverse them?)
francois
Replied June 6, 2007 at 18:44 #1916971PFozz
ParticipantHey Taz,
Actually, this is how Roland MH pads are built.
It should especially improve the positional sensing accuracy.
Best.www.eareckon.com
Replied January 13, 2008 at 17:23 #1918749coffee_party
Participanti have the alesis trigger I/O and did my own triggers, the only thing i soldered the Ceramic Lead of the Piezo to the sleeve of the jack ? it still works perfectly and produces sounds ? how come ? and what should be the consequences ?
Replied January 14, 2008 at 21:27 #1918761Participant> What should be the consequences ?
There’s nothing you should worry about 😉
Best.www.eareckon.com
Replied January 15, 2008 at 03:40 #1918763Participantjust curious, how come even though i made the wrong wirings it still worked perfectly ? does this wiring diagrams really matter ? what should be the advantage if i wired them correctly ? Thanks for the reply!
Replied July 7, 2008 at 22:07 #1922119chiodoa
Participanthello,
I have a question about the alesis wiring.
Is this diagram for alesis trigger i/o?
I have a alesis dm5 and as far as I know its inputs are all mono.
Can I use this diagram for alesis DM5?Thank you and best regards,
Alessandroe-Chiodo
Replied July 8, 2008 at 17:48 #1922128gastric
ParticipantNote the graphics are specific for Roland wiring requirements to accomodate Roland modules.
For the Alesis D4 and Trigger IO I always wired ceramics to the TIP or RING and brass always to the SLEEVE. I cannot say for the Alesis D5 as I never owned one.
Christopher Graham
Replied July 8, 2008 at 22:44 #1922132Participant
or the Alesis D4 and Trigger IO I always wired ceramics to the TIP or RING
huummm
but are you able to use rim and head piezos in the same D4 trigger input ?
do you use stereo jacks?because as far as I know both D4 and DM5 are mono trigger inputs.
Thanks for the help.
Alessandroe-Chiodo
Replied July 9, 2008 at 00:51 #1922134ParticipantNo, the D4 is mono only. So you would normally only use mono jacks and mono cables, thus only tip and sleeve for the D4. However, you could easily have a stereo output from your trigger (head and rim, or bow and bell) then split the stereo cable to two monos before inputting to the D4. Less cabling on the trigger end.
The Trigger IO has stereo TRS inputs thus you can use a stereo cable and output from your triggers if you’re so inclined. The opposite of my splitter note above, I actually have a couple of choke switches wired in mono and run to a stereo-to-dual-mono splitter on my Trigger IO to not waste a bunch of stereo inputs on mono triggers.
Christopher Graham
Replied December 3, 2008 at 18:09 #1924960Replied March 22, 2009 at 09:08 #1926818 ManoloParticipant
ORIGINAL: aquira
what about yamaha pads wiring?
any of you know how they wired?
Bump this. I can make DIY trigger for head piezo work but can’t have the rim sound. Any idea ?
Replied March 28, 2009 at 16:36 #1926944ParticipantHi,
The Yamaha pads are wired this way :
Piezo + (Ceramic part) -> Tip
Piezo – (Brass part) -> Sleeve
The “rim” circuitry of a 3 zones pad acts as 2 switches. One of this “switch” is a simple one. The other one has a 10k resistor mounted in serial.
Both are linked to the Ring/Sleeve couple.
A dual piezo/switch pad will work as well.
To build a piezo/switch pad, your best bet is a KRC (Keith Raper’s Circuit) between the rim piezo and the jack socket (sleeve/ring).
This circuit is described in another thread.
Best regards.www.eareckon.com
Replied June 16, 2009 at 12:47 #1928392superbonham
ParticipantHi there,
I would like to build a 3-zone snare (yamaha style piezo/switch/switch for DTXpress IV) from a dual acoustic trigger (piezo/piezo) on a mesh head. As I have no idea about electronic circuits I would greatly appreciate some help on this.
I would like to get the following behaviour using a modified KRC:
– head piezo trigger -> velocity
– rim piezo switch -> “switch 1” (simple one) for cross sticks
– rim AND head piezo switch -> “switch 2” (10k resistance) for rim shotsTo preserve the snare head only sound, it will be crucial that the head piezo won’t “switch” alone (i.e. without the rim piezo also switching) – I hope a sufficiently high resistance with the head piezo switch will generate the desired behaviour within the DTXpress?!
Can this be achieved by using two different resistors with the two switches (or even two potentiometers to adjust the behaviour)? Will changing the polarity of one of the piezos be of any help (just guessing)? Is there any other (not too complicated) circuit that provides the specified behaviour?
As I said I would be glad about any hints,
Thanks
Ben
P.S.: I hope I managed to illustrate the problem correctly (English is not my native language so please bare with me).
Replied March 21, 2010 at 03:39 #1932963Bean
ParticipantThe polarity of the piezo will affect the latency response thus affecting the module ability to eliminate cross talk.
Also positional sensing accuracy on Roland modules might suffer (so equipped and enabled).
Positional sensing and cross talk elimination add latency to response time at the benefit of improved velocity accuracy and more predictive (as in constancy) in dependable responses.
As the crystal compressed and expands from the vibration it produces a voltage spikes with little amperage and then a reversed (inverted) bounce spikes at a lower voltage: The module will anticipate a negative spike first if the wiring is biased for negative. The AC wave continues until the piezo settles still.
- Bean
-
AuthorReplies
Please log in to read and reply to this topic.
