2Zone/3Zone Choke Capable Cymbal
by PFozz
I received a nice amount of requests for more info about my 3Zone HH.
Before I write something about how to build one, I had to find an easier way to do it.
I’ve tried to work with polyester resins, PVC solvent, and that kind of smelly stuff. I must say that working with these products isn’t a real pleasure for my nose and head. Hopefully, the results aren’t that impressive… Some tries were a total failure, but I’ve learnt new things about resins.
Anyway, I recently rebuilt the roof of the shed in the garden and applied some bitumen tape to waterproof the sides.
Discovering the properties of this stuff, I needed to try it on the back of an acoustic cymbal.
This thing is so efficient!
It’s easy to apply, and it perfectly dampens acoustic cymbals.
It’s thick enough and it’s flexible and so it won’t break.
It nicely sticks to metal and won’t go away but it’s still removable with some efforts.
Unfortunately, it’s kind of ugly… and you need something to put over the bitumen tape in order to get a sweet cymbal.
You may put another cymbal, a painted acrylic cymbal, or whatever you want to see on the back of the instrument.
And since it’s cold those days, I didn’t want to explore the local shops for the nice cheap stuff that would do the job. That’s why I looked for something in the house, and found something to try.
It’s a place mat coming from Ikea. This thing is so adapted to the project that dispite the seasonal laziness, I drank a warm coffee, put a coat on my back, and quickly went out to get 10 of them.
Let’s write an ‘how to’ about my 2/3zone cymbals, now.

Material list :
– Self adhesive waterproofing bitumen tape (with an aluminium or vinyl foil)
– 1 Ikea PANNÅ place mat (diam. 37cm) made of EVA (various colors available)
– A good length of extra heavy duty double sided reinforced tape (cross woven construction)
– A short length of double-sided foam tape (I do prefere to do it myself using some double-sided reinforced tape and a piece of 1mm thick neoprene foam)
– 1 acoustic cymbal
– 1 to 3 or your favorite piezo transducer.
– 1 plastic box
– 1 to 2 jack sockets
– 0 to 2 home made Piezo/Piezo to Piezo/Swicth adapter (cf. Keith Raper’s circuit)
– Wire.
Instructions :
1 – Dampening the cymbal
1zone cymbal : Cover the back of the entire cymbal with bitumen tape and cut the unwanted part around the cymbal.
Keep the bell free of bitumen tape.
Cut a small disc from the bitumen tape in order to make a room for the main piezo.
2zone / 3zone cymbal : Same technique, but you have to let about 3cm from the edge of your cymbal free of bitumen tape.

2 – Preparing the covering
Cut a disc in the centre of the place mat, the size of your bell, and a smaller one for your main piezo. Cut the unwanted part around the cymbal (if your cymbal is smaller than the covering material)

3 – Adding the electronics
A picture is probably better than a long text.
2Zone

3Zone
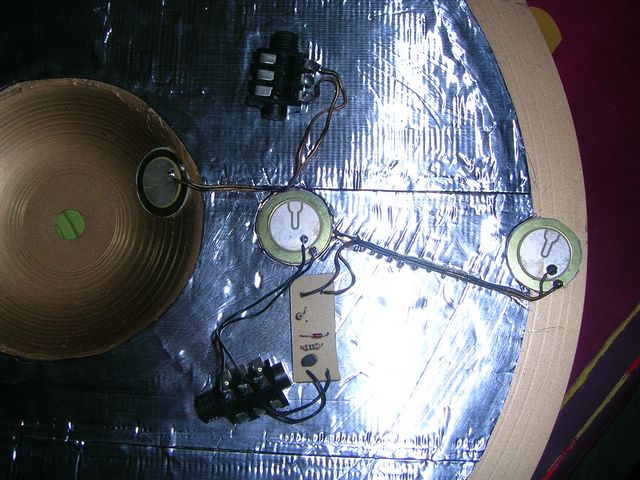
The main piezo (set on the bow) and the bell piezo must be fixed using double-sided foam tape (some like to use half a disc instead of a full disc under the piezo).
The edge piezo can be set using the thinner double-sided reinforced tape.
Hide the wires into the bitumen tape (cut a line).
If you want to build a simple 1zone cymbal, just keep the main piezo and forget the other piezos and the PP to PS adapter circuit.
4 – Covering the all thing
Put some double-sided reinforced tape on your bitumen tape, but don’t remove the protection yet!
Put a lot of it around the main piezo room (it will help the plastic box to stay in place later).
Make all the electronic stuff pass thru the small hole and check for bumps on the surface to cover.
Keep the covering stuff correctly placed on your cymbal and remove the tape protection little by little.


5 – Finishing
Prepare the needed holes in the plastic box for the main piezo and jack sockets. Check them twice 😉
Use a piece of double-sided reinforced tape to fix the plastic box on the covering material (when I say extra heavy duty double-sided reinforced tape in the material list, I mean really heavy duty ^^).
Secure the jack sockets and put the box cover.


Put a small disc of bitumen tape over the visible piezo transducers (it will help to secure the solder points, and be a cool thing to “choke”).
2Zone

3Zone

6 – Setting up your module
1Zone :
Plug your trigger then set the sensitivity and main parameters.
2Zone :
Use a dual Piezo/Switch capable input.
Set the trigger type as you would do for a Piezo/Switch cymbal (CY-8 / PCY-65S, for exemple)
Set the sensitivity and main parameters.
If the the edge triggering is too sensitive, add a pot between the edge piezo and the PP to PS adapter, and adjust it.
3Zone :
Use a dual Piezo/Switch input + a mono input (or a dual one)
Plug the bow/edge output of the cymbal to the dual input.
Plug the bell output to the mon input of your module.
Set parameters for the bow/edge part as you would do with a 2Zone cymbal.
If the the edge triggering is too sensitive, add a pot between the edge piezo and the PP to PS adapter, and adjust it.
Set parameters for the bell part as you would do with a 1Zone cymbal, then set its threshold so your harder tip hits on the bow don’t trigger the bell.
7 – Choke switch
The edge piezo combined to the PP to PS adapter will act as a choke switch.
Cherry on the cake 🙂
8 – Some ideas to experiment with…
– If you own a Roland 3Zone ride input, you may add a additional PP to PS adapter between the bell piezo and the Bell jack socket (sleeve/ring). Don’t forget to link the main piezo to the tip/sleeve couple of this same socket.
You’ll get the needed Bow/Edge and Bow/Bell output this way.
– If you want to use a Yamaha 3Zone input, you may use 1 single jack socket. Firstly mount the 2Zone electronic part then add a PP to PS adapter AND a 10k resistor between the bell piezo (+) and the ring of the single jack socket.
– You may build such a cymbal from a practice cymbal and use another place mat as your playing surface.
There is a lot of things to do… be creative and please share your ideas here 🙂

9 – Want to know why it works ?
Please put your request in this thread 😉
Enjoy.
www.eareckon.com
And here’s a simple 1Zone splash.

Covering the bell is probably not a good idea, though 😉
Best.
www.eareckon.com
hi pfozz!
it’s been a long time!!!!
i have sent you an email for a lot of things… and one question about this thread :
what is the bitumen tape and where can we buy it?
francois
Hi François,
It’s nice to see you here again 🙂
The french translation for “bitumen tape” is “Bande d’étanchéité goudronnée auto-adhesive à froid”.
I found it at “Castorama”.
Cheers!
PS : I’ve replied to your email.
www.eareckon.com
Hey PFozz,
Great tutorial…very concise. I’d like to ask a few questions if you don’t mind. I have been playing around with Beatnik’s design (practice cymbal below an acoustic cymbal) and trying to modify it to work as a dual zone with choke. I was going to try to modify it using a concept proposed by Cosmograph over on vdrums.com. The basic idea is to mount the second (edge) piezo on a cantilevered beam on the underside of the cymbal. This is supposed to give good separation between the bow and edge piezo.
Before going through all that work, I thought I would give your design a shot. So, I opened up my Beatnik cymbal and mounted an edge piezo near the edge. I hooked everything up via the Raper circuit and viola…to my surprise, I got edge sounds. Although I really had to crank up the resistance on the potentiometer to prevent the edge sound from triggering with even the slightest hit. I wasn’t ever to get it to go away for moderate hits so I probably need more resistance (I am already up to 100K).
Anyways, my real question is about the choke capability. I got the cymbal to choke under two conditions: (1) if I hit the edge fairly hard and (2) if I squeezed the edge near the piezo (sometimes). So my question is, could you explain how and why the choke works and do you have any tips on how to improve it’s behavior (ie. not choking when striking it hard and improving the consistency of choking while squeezing the edge).
Thanks,
lidrummer
Hi Lidrummer,
How the choke capability works :
Here’s how most modules calculate what must be done :
Excited Main Piezo + Activated Switch (simultaneously) = [EDGE] the edge note is played/sent
Sleeping Main Piezo + Activated Switch = [CHOKE] all the sounds assigned to this multizone trigger stop playing and a KeyAftertouch MIDI message is sent.
Why it works :
Edge hits :
The PP to PS adapter converts the signal coming from the edge piezo to a “switch state”.
Since the edge zone isn’t dampened (no bitumen tape), the edge piezo will be far more excited if you hit the edge.
And if the sensitivity of the edge piezo is reduced (using a pot or a resistor), the “switch” will be activated on hits on the edge only.
Of course, if both the bow zone and the edge zone are equally dampened, the difference between a hit on the bow and a hit on the edge won’t be obvious.
Choking :
Piezo transducers react to bending actions.
Troubleshooting :
> I got the cymbal to choke if I hit the edge fairly hard.
The edge piezo is probably excited twice (double triggering). Firstly, check if the practice cymbal doesn’t slap back the acoustic cymbal or something like that. Then try to reduce the edge piezo sensitivity using a pot/resistor and/or a disc of double-sided foam tape between the piezo and the cymbal.
> I want to improve the consistency of choking while squeezing the edge.
You may try to extend the “choking area”. Cut an arc of circle out of metal or thin MDF. Place 2 pieces of foam at its extremities and another (smaller) one at the “middle” of this arc so the extremities touch the cymbal while the “middle” lay on the piezo. I haven’t tested that, but I plan to add something like that to some of my cymbals.
I hope this helps,
Best.
www.eareckon.com
PFozz,
Thanks for the response with the additional info. I think everything is starting to make sense now.
Double Hitting of Main Piezo:
I currently have a sheet of rubber toolbox liner material between the a-cymbal and the plastic cymbal but it covers the entire surface area of both. I also have the bow piezo mounted via double sided foam tape to the plastic cymbal near the bell with another pad of foam on top of it between the piezo and the a-cymbal. I think that I should be able to fix this problem by adding another sheet and cutting the diameter of both sheets back to expose more of the edge of the cymbal where the edge piezo is. This should also help isolate the two piezos from each other a little more. Kind of like you did with your tape. Also, I am going to remove the foam on top of the piezo to try to make it a little “hotter” than the edge piezo.

> You may try to extend the “choking area”…
Funny you should mention this. I was discussing my thoughts on the “under the plastic cymbal beam with the edge piezo mounted to the tip” design with some co-workers today. They tended to think that this was probably not a very robust idea. So, we came up with an idea to do exactly what you suggested…an arc of thin metal supported at the two ends. I was actually going to mount the edge piezo directly to the midspan of the arc and place a rubber/foam dot under it (between the piezo and the plastic cymbal). That way when I press on the plastic cymbal, the vibrations of the edge piezo should stop?
Thanks again,
lidrummer
Hi Pfozz I am new to this forum. I am in the process of building the 3 zone ride. I have the TD20 Roland brain. Could you please go into more detail about building the 3 zone ride for Roland. Are you able to get all three zones to choke? I am using a 180 degree half circle piece of sheet metal and spaced with foam tape for the choke mechanism, this is mounted to a cymbal. I have been having trouble getting all three zones to choke. I can get the bow and edge to choke but when I wire in the bell that is connected to a separate jack output it makes the bell and edge trigger the same sounds simultaneously since they are both on the sleeve and ring of the jacks and the those wires all need to connect to the choke making them a circuit. What I need to do is to get that bell to choke along with the bow and edge but have the bell not be connected to the other piezo transducers. Does this make sense? Its a bit hard to describe. Maybe a step by step of the Roland three zone would help me. Any advice on getting the entire cymbal to choke using my metal choke ring and keeping it three zone would be great. Thanks so much, Toddzilla
hi http://www.toontrack.com/forum/showProfile.aspx?memid=890
thanks for this thread. can you give me the parts/materials need for bow and edge switching including diagram if you don’t mind.
thanks
I’ll second that request… I would love to hear more about this concept. Thanks PFozz 🙂
Hi all,
Using a TD-20, I think a CY12RC or a CY15 should work the way you want, if both the cymbal sockets are linked to the Ride/Edge inputs couple of your module.
What you need is a cymbal that works the same as such a cymbal : One piezo and 2 switches.
Here is a diagram :

Hope this helps,
Best.
www.eareckon.com
hi all!!!
if it’s for a td20, you have to invert polarity on the MAIN piezo…
in the pfozz wiring diagram, ceramic part is link to the tip of the jack and yellow part, to th sleeve…
with roland module, you have to invert: ceramic part to the sleeve and yellow part to the tip…
it’s only for the main piezo!!!
it will work if you don’t invert, but i think you will have better rim detection if you invert the wires…(i think roland invert polarity, so the module can easilly detect if the voltage signal comes from main piezo or rim piezo
francois
edit 10/04/08 :
i have build today a 16 inches 1 zone crash, with choke switch… it’s only the mechanical part (no have time to finish today, i only have to put a piezo and it will be ok)
the choke is very simple: aluminium (in your kitchen) double side taped on the bitumen tape (there is a wire which is in contact with the aluminium) then, first place mat cut where there is aluminium below and second place mat bigger than first to cover what you’ve just cut you have to put aluminium below this second place mat (same technic: double side tape, wire, aluminium)
the result :

francois
others photos on http://edrum.spaces.live.com/
(oops some problemsto upload pics)
Please log in to read and reply to this topic.
Missed the deal?
Don’t forget to select
your free product!
The free product is included with
your purchase.
Your cart is empty.

Get all the latest on new releases,
updates and offers directly to your inbox.
Note: By clicking the 'I WANT IN' button, you will not be creating a Toontrack user account. You will only sign up to get our newsletters, offers and promotions to your inbox. You can unsubscribe at any time from a link at the bottom of each email. If you want to learn more about our privacy policy, please find detailed information here.

